Tuesday, August 31, 2010

The Emerald City

Sorry for the lack of posting last week. I decided to take an impromptu trip up to Seattle to visit Chrissy and Will and the kids. I had an amazing time and truly felt like I was unplugged and on vacation. Thanks guys!

Here are a few photos from the trip. I apparently didn't take pictures at the beach, on our nature hikes, in the living room of the fort/house I constructed out of pillows, chairs, and blankets with the kids, etc.

At the Salmon Locks. Note little J's fab sunglasses!


The salmon have a "ladder" that helps them swim upstream despite the large dam in place.


Posted at the Edmonds Farmers' Market.
I wish they also had people rules, especially #1.
Why is that just for dogs?


It didn't photograph well, but this is an incredible copper backsplash on the bar at Still where we stopped for a pre-dinner cocktail before heading to kid-free dinner at Sitka and Spruce. Dinner was FANTASTIC. If you are in Seattle, go there!


The site of (Adult) Girls Day Out. So fun!


Proof that cheap dime-store foil Christmas tree garland can be totally fabulous.

 
This was our attempt to acquire "pre-owned" cheese at a discount.
We failed. (We got there just as they were closing the doors.)


The other thing I forgot to mention is that Chrissy has become a master baker of gluten-free breads. So I was treated to actual bread this weekend which was fantastic. Thanks Chrissy!

This weekend is going to be three whole days at home with (I hope) lots of time to work on projects. Hopefully will have more posts to share soon.

Monday, August 23, 2010

Brilliant Bookcases

I grew up around a lot of books. Literally thousands. (Haha.) Book storage was a constant problem (or, as we like to say at work: "opportunity"). I have carried this love of books into my adult life and have tried to be diligent about recycling all but the most precious of them. Currently my collection fills about one and a half large bookcases. Could be worse, believe me.

But while some consider them "clutter," I love the design element that books add to a room. That's right, books are not just for reading. We are talking brains and beauty in the same package. If they are styled right, of course.

Recently, I stumbled upon this blog which has a fantastic collection of bookcase solutions to browse.

All these great pics have the wheels turning in my head since I'll need to figure out some new book solutions soon. As part of the Great Furniture Rearrangement currently underway in my apartment, the bookcases presently in the back half of the living room are going to have to be relocated or removed entirely. Hmmm...

Wednesday, August 18, 2010

Getting Creative in the Kitchen

This post might get a little TMI-y. Sorry in advance.

About a year ago I visited my allergist, who informed me that I'm allergic to wheat. In fact, when they tested me, it was one of the things I was allergic to most (along with grass, dust mites, and rabbits.) Of course, I've been eating wheat, oh, for 31 years with no apparent side effects. I basically ignored this information, although I did think it odd that I got a little congested when eating sandwiches. But whatever, right? It's not like my throat was closing up or something. And then, out of the blue this past Monday, it occurred to me that maybe the reason I have such a sensitive GI tract (I wish I could just say "stomach," but it's really the whole system that seems to be screwed up) is the wheat. This inspiration came after I felt like crap after my lunchtime sandwich - which was on a (gasp) wheat baguette.

Maybe so, maybe not. The only way I'm going to figure this out is by trying it. So I decided go wheat-free for 2 weeks to see how I feel. No time like the present.

I invented this wheat-free recipe on Monday because I had an eggplant, some zucchini, and some tomatoes that I needed to use courtesy of the farm box. The inspiration for my recipe came from here, but barley is a food I'm not supposed to eat, so I had to get creative. I considered using quinoa but I thought the grains would be too small and weird when combined with the chunky vegetables. Here's the result - pretty tasty!

It tastes better than it looks.

Eggplant, Zucchini, and Chickpea Salad
Makes 4 servings

Ingredients
Roasted Vegetables
1 medium sized eggplant (1 to 1 1/2 lbs), cut into 1/2 inch cubes
2 medium sized zucchini (3/4 lb), cut into 1/2 inch cubes
1 red onion, peeled, cut crosswise, then each half cut into quarters
1 tablespoon extra virgin olive oil
1/2 teaspoon kosher salt
1/2 teaspoon fresh ground pepper

Chickpeas
1 tablespoon extra virgin olive oil
3/4 cup chopped scallion (white and green parts)
3/4 teaspoon ground cumin
1/4 teaspoon ground coriander
1/8 teaspoon ground cayenne
1/2 cup low-sodium chicken broth
1 can chickpeas, drained and rinsed

Dressing and Extras
1 tablespoon fresh lemon juice
1 tablespoon extra virgin olive oil
1 garlic clove, minced
large pinch of kosher salt
large pinch of freshly ground pepper
pinch of sugar

1 medium tomato, cored, seeded and chopped
about 12 kalamata olives, pitted and roughly chopped
1 cup chopped flat-leaf parsley
1/4 lb ricotta salata, chopped or sliced thinly

Directions
Make the Roasted Vegetables
Preheat oven to 425 degrees F. Combine veggies, salt, pepper, and oil, and toss to combine. Spread on a large rimmed baking sheet and roast for 20-30 minutes until vegetables are browned and a little shrively. (Start checking at 15.) Remove from oven and set aside. When the vegetables are cool enough to handle, remove the onions and chop them roughly into bite-size pieces. Add back to pan and set aside.

Cook the Chickpeas
Meanwhile, heat the oil over medium-high heat in a medium skillet, saute pan, or sauce pan until shimmering but not smoking. Add the scallions and spices, and stir until fragrant (about a minute). Add the drained chickpeas and stir for 2 minutes until coated by the spices. Turn down the heat to medium and add the chicken broth. Simmer until very little broth remains (about 1 tablespoon total). Remove from heat and set aside.

Make the dressing
Whisk together lemon juice, oil, garlic, sugar salt and pepper.

Finish the salad
In a large bowl, combine the roasted veggies, chickpeas and their sauce, tomatoes, olives, and parsley. Toss to combine. Add the dressing and toss again to coat. Sprinkle the cheese on top.

Can be served hot from the oven, warm, or cold.

Tuesday, August 17, 2010

One Disaster After Another

You know how in the post about the Salted Caramel Squares I talked about how I'm not such a great baker? I wasn't being modest.

This past weekend I baked up some cupcakes to celebrate Blake and Britta's 5th Anniversary. Let me take a moment to quantify "some." Some = 6 dozen. It should have only been 3 dozen, but I screwed them up. Apparently two of my three cupcake/muffin pans bake this recipe a lot faster than the recipe indicates. Which left me with a first batch of 2 dozen inedibly burnt and 1 dozen perfect white cupcakes.

Left - burnt. Right - perfect.

The photo doesn't even really do these justice. The bottoms of the burnt cupcakes are actually black and carbon-y. The burnt cupcake wrapper and the burnt bottom of the cake are one black, flaky mess. Gross.
So I baked up a second batch of cupcakes. Even though I took them out a lot sooner, I still had a few unacceptably darkened bottoms, but in the end, there were enough cupcakes for the party.

Then it was time to move onto the frosting. I selected a vanilla buttercream because I wanted them to look wedding-y for this wedding-themed party. Somehow, the buttercream was another fail. I don't know how, but when it was done, it tasted like butter. Not like vanilla. I ended up dumping about a cup and a half of powdered sugar and at least 2 tablespoons of vanilla and Grand Marnier in an attempt to give the frosting a flavor other than butter. No dice. With no ingredients left to work with, I gave up and piped the cupcakes.

While I was piping frosting onto the cupcakes, I heard a crazy loud crash followed by a louder crash. Outside the window seen below, there was a huge accident in the intersection, and one car had hit the building diagonally across the street from mine after hitting the other car.

So I called 911. Amazingly, the driver whose car was stopped by a large apartment building was fine, despite having to be cut out of the car by the fire department. People, this is why you wear seatbelts. This is the fourth accident I have witnessed in this intersection in the past year. SFers, be warned.

Anyhow, this was the final result. Cake: 9/10, Frosting 3/10 (would be a 2 but the sprinkles were tasty).


Oh, and here's the recipe for the cupcakes. I always trust Martha Stewart recipes for baking - every recipe comes out perfect (pan issue not withstanding). I'm not posting the frosting recipe. Next time, I'll just use The Cake Bible, which is what I should have done in the first place.


Friday, August 13, 2010

Sneak Peek

Here's a sneak peek of a project yet to come, courtesy of the fabulous M&J Trimming, where I wandered over to after work a couple of nights ago.

That flowered embroidered trim cost a pretty penny, let me tell you. Why do I always like the expensive stuff?


Wednesday, August 11, 2010

Indecent Exposure

One day last week I woke up and blearily wandered out of my bedroom and into my bathroom. I sat down on the toilet. I looked up.

And here was what I saw:


Logic follows that if I can see this dude, he can probably see me. Wearing something not fit for public consumption. On the toilet.

Fantastic.

For the last year neighbor visibility hasn't been a problem. I think they've been gutting the apartment across the street. The windows have been covered with plywood this whole time. Surprise! Looks like they are done. And because of the layout of my apartment, I now either have to close my bathroom door all the time (annoying, plus steam builds up in there when I shower because there's no fan) or find another solution. Blinds are not an option as the ones on this window are broken. (Thanks, previous tenant!) I briefly considered embracing the spirit of exhibitionism, but it's just not me.

Yet another trip to Ikea for more bits and pieces for the craft room lent itself to picking up a couple of 49 cent dishtowels in white with a red stripe. I happened to have a cafe curtain rod on hand and some curtain clips from Umbra that I bought ages ago in Austin. (A ha! THIS is why I keep these things! So proud of myself.)


And for a grand total of half what I spent on breakfast this morning at Starbucks (not joking), I had this semi-elegant solution for getting my privacy back. You can see that I didn't bother ironing these. Maybe next time I iron something I'll take care of this. Maybe not.


The people on the above floor keep their blinds shut all the time, so I think this is safe for awhile. Plus the white still lets the light in. I love natural light.

Problem solved!


Tuesday, August 10, 2010

The Best Thing I Ever Made


I first made these Salted Caramel Squares for Christine's "Boarth of July" party (boar sausages and proscuitto were both featured meal items) because it's from the chef and owner of Huckleberry in Santa Monica, which Lindsey took me and Ann to this past January. Huckleberry was delicious and I figured these would be good. I did not know how good they would be.

I do not really consider myself much of a baker. I have a long and storied past of screwing up various baked items, such as the time my cookies spread all over the cookie sheet (still not sure why) or the chocolate cake I made with extra virgin olive oil. There's probably a way to do that to make it taste excellent, but mine was gross. Really, really gross. And I wasted a lot of really good olive oil.

Because of these seminal events of my childhood, I don't have a lot of faith in myself when it comes to baking. In general, I do ok at baking, but the things I bake are definitely not my best or favorite food efforts overall.

And then I made these Salted Caramel Squares. I brought them to Maybay's party last weekend and I do believe they were quite a success. One guy actually told me I changed his life. Not bad for a few humble ingredients.

Here's the recipe. I'm putting my pictures in the middle of the directions so you can see what things look like in progress.

Salted-Caramel Squares
by Zoe Nathan


ACTIVE: 30 MIN
TOTAL TIME: 2 HRS  (At least!)
SERVINGS: Makes 32 squares  (or more - I like to cut them a bit smaller)

Pastry Shell
1 stick unsalted butter, softened
1 cup confectioners' sugar
2 large eggs, beaten
2 cups all-purpose flour
1 teaspoon kosher salt
1 large egg white, beaten


Caramel
2 1/4 cups heavy cream
1 vanilla bean, split, seeds scraped
2 1/4 cups sugar
1 3/4 sticks unsalted butter
2 1/2 teaspoons kosher salt

1. Preheat the oven to 350°. Line a 9-by-13-inch baking pan with parchment paper, leaving a 2-inch overhang on the short sides. In a large bowl, using a handheld mixer at low speed, cream the butter. Beat in the confectioners' sugar. Add the whole eggs and beat until incorporated, then beat in the flour and salt.


 Press the pastry into the prepared pan in an even layer, 1/4 inch thick. Freeze until firm, 10 minutes.

(Kate's note - You don't really "press" this pastry - it's really sticky. I have had best success using a stiff metal spatula like you might use for icing a cake. If you don't have one of those, just use a table knife to spread this over the parchment.)

2. Line the pastry with parchment paper and fill with pie weights. Bake for 35 minutes, until just set. Carefully remove the pie weights and parchment. Brush the shell with the egg white and bake for 20 minutes longer, until golden and cooked through. Let cool.


3. In a saucepan, bring the cream, vanilla bean and seeds to a simmer. Cover; keep warm.


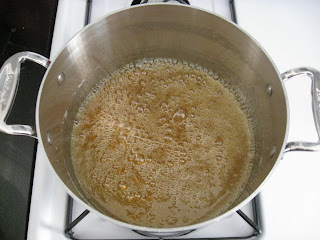
4. In a large, heavy saucepan, stir the sugar into 1/4 cup of water. Simmer over moderate heat, without stirring, until a deep amber caramel forms, 7 minutes.
No color yet. This is approximately the 10 minute mark.
Zoe's stove is obviously more powerful than mine.

Appoaching the 20 minute mark. Starting to caramelize...slowly...

And we're deep amber. At about minute 25.

5. Remove the caramel from the heat and carefully add the cream. When the bubbling subsides, stir in the butter.

I never said this was good for you.

Insert a candy thermometer and cook over moderately high heat, stirring with a wooden spoon, until the caramel reaches 240°, 10 minutes.

10 minutes my ass. I think this stage takes me 20-25. Possibly 30. I don't know.
I think I get a little delirious around minute 18.
You have to stir constantly and watch the temperature like a hawk.


Success! Exactly 240 degrees, or in candy-making parlance, "soft ball stage."


Discard the vanilla bean and stir in the salt. Pour the caramel over the shell. Refrigerate until firm, 4 hours or overnight; bring to room temperature. Remove the bar from the pan using the parchment overhang; cut into squares.

If you follow this recipe exactly, these come out perfectly. I highly recommend you invest in a candy thermometer and go to town on these. You will not be disappointed.


I like to sprinkle some Maldon Sea Salt on the top.
Keep these in the fridge (if you have leftovers, which you probably won't.)


Monday, August 09, 2010

Another Week, Another Hotel

I'm shacked up at the W Times Square for the next few days. I have to say, the room is surprisingly spacious and nice. It also seems to be soundproof and the room darkening shades are great at blocking the sights and sounds of this view:


But I think the closet might be my favorite part of the room. Ok, not more favorite than the soundproofing. A close second, though.


That's right, the inside of the closet is fuschia. So fabulous! And what a great idea. I might just have to paint my closet at home...

A Tale of Two Appetizers

Charles Dickens is most surely rolling over in his grave at that title.

First, an apology - I know I am way behind on this blogging thing. It's hard to get back in the habit!

It was Maybay's birthday last weekend and she requested I bring an app. I got really excited about the options and brought two. I decided that it would be fun to bring a high-brow dish and a low-brow dish, in honor of the true fabulousness of the event's honoree.

High-Brow: Prosciutto and Fontina Pinwheels from Food and Wine

I love using puff pastry because it is basically idiot-proof. Thanks, Pepperidge Farm.

The first thing you do is roll it out. Actually, the first thing you do is thaw it. Then you roll it out. It helps to have a rolling pin for this. I misplaced mine. Which I discovered after I spread flour all over the place.


Luckily, after searching every cabinet in my kitchen three times, I remembered that maybe Mer had the pin. Success! She did (from Easter - clearly I use this thing a lot) and she was home. Game on!

Rolling out the dough is super easy. Once that's done, you just layer the goods on and roll it up.

I think the recipe lied and in retrospect I think I would put some more prosciutto on them. But they turned out ok.

They looked pretty and tasted good and sometimes that's enough!

*********

Low-Brow: Goop

For the record, this dip was named long before Gwyneth Paltrow started her little blog-newsletter. In fact, I'm pretty sure we have it in print from an employee cookbook made by my Dad's employer in the 80s. Maybe we should sue Gwyneth. Lawyer friends, do we have a case? Any chance I can get my hands on some Coldplay cash?

Frivolous lawsuits aside, this delicious dip has been passed down from my grandmother, Nana (which is pronounced like the start of the song Na-Na-Hey-Hey-Goodbye - it does not rhyme with banana).

I once tried to make Goop with "real" ingredients like fresh chives and fresh garlic because in general I like to use the most authentic ingredients I can find. Guess what? It tasted like crap. And incidentally, that's what Nana would have said had she sampled it. You can't deviate from the ingredients or it just doesn't taste right.

Trust in 60+ years of this recipe. This stuff is freaking delicious - garlicky and addictive. And you would never guess it's made from cottage cheese.  

Goop
Makes about 2 cups.

Ingredients
  • 1 - 16 oz carton small curd cottage cheese with chives (Yes, the kind that already has chives in it. Trust in the recipe.) If you use low fat cottage cheese increase the mayo about 2 tsp. If you use large curd cottage cheese, you'll have to beat it harder and longer. That's what she said.)
  • 2 heaping Tbsp mayonnaise. Regular or lite is fine. Non-fat is unacceptable.
  • 1/4 tsp + 1/8 tsp garlic powder
Directions
Put everything in a bowl and mix with an electric hand mixer on high speed or food processor until all the curds are decimated and it's all very smooth with just teeny tiny curd texture. Chill. (You can scoop it back into the cottage cheese container, which is the traditional storage method for this dip.)

Serve with:
Mandatory: Jays ridged chips (or if you are not in Chicago and can't get Jays, you can use Ruffles)
Optional: dipping vegetables - carrots, celery, broccoli, bell pepper, cucumber

Voila.