Tuesday, July 23, 2013

Salads on a Plane!

I'm on a plane right now. It's a bit bumpy. It's hard to tell if it's bumpy because of turbulence or if it's because the guy in the aisle seat of my row has an aggressive leg shake. Actually, not a single leg shake. He alternates legs.

There's also a cat on the plane, two rows behind me. The cat is not very happy about flying.

This is an understatement.

In fact, said cat might be the least happy about flying of all the sentient beings onboard, except for all the people on the plane who have to listen to the cat screech and whine. 

Cat's got some pipes, man.

Anyhow,  I brought my lunch with me on the plane today because on Sunday I had the foresight to pull together this summery salad which I am having a minor love affair with this month.

Please note the gigantic bottle of water. I get two of these now before every flight. You really don't realize how dehydrating planes are until you start to fly so often that it practically hurts to blink.

This is barely a recipe. But here are the component parts.
Quantities are approximate (at best).

Kate's Summer Travel Salad

Serves 4 as a side or 2 for full meals

Ingredients

Half a sack of roasted baby potatoes. I think that's about 3 cups. I'm talking about the ones the size of large marbles because I love miniature food but of course you could just chop up and roast a regular Yukon Gold or two. (Toss with olive oil and salt and roast for 20-30 mins at 425 degrees until they are a bit browned in spots.)

A pint of slow-roasted cherry tomatoes. (Cut in half and toss with olive oil and kosher salt; roast at 325 for 40 minutes to an hour, until they get caramel-y. Yes, that's a word.)

2 large handfuls of steamed green beans, trimmed, and cut into 1- to 2-inch pieces

Sauteed chunks of summer squash, from about 2 squashes, any shape. I like mine sauteed to the point of being practically charred. It tastes delicious like that. 

One-third of a bunch or so of flat-leaf parsley. Pick the leaves off the stems but leave the leaves whole. Or just very coarsely chop the parsley if you are lazy or pressed for time, or both.

1/2 of a preserved lemon rind. This is the magic ingredient. Chop up the rind (after removing the pulp and rinsing) into 1/4-inch bits. 

Pitted, oil cured black olives, halved. If you don't like oil-cured olives, used pitted green olives that aren't too briny. Do not use Kalamata, they are far too briny and puckery and will make the whole salad taste sour.

Extra virgin olive oil, kosher or sea salt, and freshly ground pepper


Directions
Combine all the vegetables and lemon in a bowl and toss until everything is well-distributed.

Drizzle with olive oil, sprinkle with salt and pepper, toss, and taste. 

Add more salt and pepper as needed. 

Look at that nice fat square of preserved lemon on top, mugging for the camera.

This recipe is hard to screw up so feel free to play around with it. Basil would be a great addition. So would corn.

I like adding a poached egg or two to turn this into "dinner," when not on a plane. Some grilled chicken would be great, too, and travel-hardy.

This salad is awesome because it can sit in your bag unrefrigerated for a few hours during the whole TSA-frisking-through-harrowing-boarding-process, through takeoff, and even several hours into your flight and stay perfectly fresh. There's no lettuce to wilt - the parsley stays really perky. You can also make this the night before or even two days in advance with no compromise to taste or texture. (I think the flavor actually improves when it's been mixed at least a day ahead of eating.)

Bon Voyage and Bon Appetit!


Sunday, July 14, 2013

Consider the Dishtowel

Because a lot of the people I work with are in other non-San-Francisco offices, in future time zones, I spend a lot of time on early morning phone calls, which sometimes turn into all-day phone calls, which often means I work from home.

Here's a shot of my at-home "office." (It's really the breakfast room.) I try to keep the table relatively clean (doesn't always work, but I try).


The gorgeous orchids are courtesy of my buddy Sherwin. Thanks Sherwin! My kitchen-office suddenly feels so posh. It's amazing what flowers can do for the spirit.

And this, dear friends, is my office's view.


Yes, I could sit on the other side of the table, and have a view out my kitchen window. But for some reason I prefer sitting this direction. I really don't know why. It makes no sense.

I am weird.

But you already knew that and that's also really not why we're here today.

See those posters on my wall of my at-home office space?
They aren't posters. They are dishtowels.

Proof I am not a perfectionist - the canvas is definitely not stretched evenly!

If you've been with this blog since the beginning, you will see other examples of my love of using dishtowels for tasks beyond dish-drying. This is another sneaky use for them.

I ran across these two towels at Sur La Table a couple of months ago. Turning them into fun, cheap wall art is easy; here's how.

Equipment:
A piece of fabric. See below for tips. 
A staple gun and plenty of staples. Just your basic one will do. I have one like this.
4 canvas stretcher bars that are an appropriate size for your fabric/desired finished piece. You can find these at art supply stores. They will have two kinds, the cheap ones and the expensive heavy duty ones. If your piece of fabric is less than 4' square, get the cheap ones.
Two picture hanger screws and picture wire
A tape measure or ruler

Bonus Equipment: DIY frame from the art supply store. These come in metal and wood. If you get the wood kind, you will also need a touch of super glue to join the pieces. You don't need glass for this project.

Directions:
1. I was going to type out instructions but then I found that the internet had already solved this problem for me. Instead, please enjoy this video.


2. Try not to get too annoyed as this lady is super nice but oddly bouncy.
3. Frame if you wish, then add the hanging hardware and hang your art.

So easy!

Tips for choosing fabric for this project:
Think outside the bolt on this - you can use dishtowels, napkins, old tablecloths, pillowcovers (taken apart at the seams), even old favorite pieces of clothing. Thicker and woven fabrics are easier to use; but super-thick and very thin fabrics can be challenging. Stretchy fabric is practically impossible; don't use it if you've never done this before.

A note: if you are framing something that you need to protect because it's an heirloom or whatever, take it to the professionals to get it framed. This project is more about doing a quick change on what's on your walls and creating some "cheap art" for yourself. Otherwise, if your fabric is iron-able, iron it as best you can.

Some other examples from around my home:

My motto. In the kitchen, of course. This piece also began life as a dishtowel.
A Marimekko "Lokki" panel atop a bookcase.
More Marimekko panels. Previously in my office, now adding some color to a quiet corner of the living room.


Thursday, July 11, 2013

Since Last Year: A Summary

This morning I am going to WOW you with my breakfast.


Boom.

Your jaw dropped, right? Almond butter and homemade blackberry jam AND peaches on a RICE CAKE?! STOP IT! KATE, YOU HAVE GONE TOO FAR.

Ok, let's get real for a second. I've been away for awhile.  Babies have been conceived and born in the time I’ve been away from this blog.

Just to be clear: Exactly NONE of these babies were mine.

Everybody got that?

It’s not that I haven’t been making things. I have been. I just haven’t been writing about them. For some reason life just felt too busy.

And then, just like that, it didn’t.

Now here I am with three posts on three consecutive days like I've never even been gone. I don’t know what happened. Maybe it’s summer daylight lasting until 9pm.
Maybe it’s something else.

Whatever it is, herewith, some things I did when I wasn’t here.*

*Not in chronological order.

I gold leafed a bunny.

Isn't he cute? Also, I learned that gold leaf is messy. It is definitely a cousin of glitter, "the herpes of craft supplies."


I had an Oscars party.

We had a red carpet, too. Natch. The tape adhering the red carpet stuck to my floor. Still can't really get it off. Yes, I've tried Goo-Gone and scraping. Good thing this is a rental.


I made some necklaces.


And some bacon candy.


I bought some art and hung it up.


I made brownie sundaes.

Make your own hot fudge sauce and brownies; buy the ice cream.


And stuffed escarole.

This looks like a mess, but it's incredibly delicious. Lidia Bastianach is a genius.


And gluten-free, grain-free meyer lemon mug cakes.

Just replaced the weird sweetener with 1T +1t of granulated sugar. These make an amazing breakfast treat, too.
 
Ok, I made those a couple of times.

I made some ridiculously tasty Banana Bread with Coconut and Rum. Oh, and browned butter. Thank you, Joy the Baker, for that one.


And thank you, Blake, for your hunting skills.

This went into a "Goose Bourguignon" recipe. Which turned out gamy, but edible. I count it as a win.

Turns out making a wild goose edible requires a LOT of ingredients.

Britta was an amazing co-chef on this one. Turns out butchering a goose is a fairly nasty process.


On the lighter side, I made some appetizers.

These are purple rice crackers with avocado, a little greek yogurt mixed with a little lime juice, and garnished with my new favorite seasoning, shichimi togarashi. Virtuous, yet delicious.


And roasted some rhubarb.

Delicious over vanilla ice cream although also pretty good on its own or with yogurt.


And then there was this ham. This eight pound, big ass country Easter ham.


Three pounds of which is hacked up into large chunks in my freezer.
Where it will probably stay for a year until I no longer feel guilty about composting it because what am I going to do with huge chunks of frozen ham?

Any suggestions?


Wednesday, July 10, 2013

MBAs cannot pass up low-hanging fruit. We just can't.

I recently came into possession of slightly more than a pound and a half of fresh, wild blackberries.


This is because I picked them. On, essentially, the side of the road in Sonoma County. With my friend C.C.

It was actually C.C.'s idea to pick the berries. She's the smart one. "Do you know how much these would be at Whole Foods?!"

Exactly, C.C.  Exactly.

We both came home with bags filled with hard-won blackberries. I say "hard-won" because have you ever picked blackberries? Those brambles are NOT a JOKE.

This is about what the two of us sounded like while picking berries:

"Ooh, these look great!"
"Nice!"
"OW! Motherf---!!"
"There are so many berries over here!"
"Damn it! OW!"
"My fingers are covered in prickly things."
"Can you imagine having this job? This job would really suck."
"Could you wear gloves?"
"I don't think so."
 "I am picking a lot of low-hanging fruit. Ahahahahaha."
 "AAAAAHHH Ouch."
"This. Berry. Is. SO. Sweet!"
"GODDAMN IT, BLACKBERRY BUSH! YOU HURT!"


Anyhow, then I got home and was like, "Hey, Kate, one and a half pounds of blackberries is kind of a lot to eat fresh. I mean, these aren't strawberries!"

So I got to cooking.

First I made Blackberry Jam.

I used a pretty basic jam starting point - fruit plus sugar and citrus peel/juice for pectin but I added a little of my own pizzazz. That means I put some Grand Marnier in it. When I add pizzazz, that's what I add. Now you know.

Actually, I didn't put "some" Grand Marnier in it. I put "a lot" of Grand Marnier in it because I tipped the bottle over a bit too far. No harm, no foul. I cooked the booze off a bit and you can't even really tell it's in there. I swear.


Very Sketchy Blackberry Jam Recipe I Just Made Up 
That You Should Probably Not Ever Try To Make Yourself

I took the pound and a half of (cleaned) blackberries, combined them with a long strip of lemon peel, a teaspoon of lemon juice, a bay leaf (thanks, Martha Stewart, for the ingredient suggestion!), two cups of sugar, and a pinch of salt in a 4 quart pot. I cooked it for about 10-15 minutes, then added the pizzazz. Did the whole jam-freezer-plate test, and filled a pint jar. (No processing here, just keeping this stuff in the fridge.) My wooden spoon seems to have suffered permanent staining as a result of this endeavor.


That's what I did. What I should have done was mash and strain the seeds out of the berries first, before I started cooking. Instead I strained some of the seeds out partway through - about half of them. Half, it turns out, isn't enough. Trust me when I tell you there is a reason you can only buy seedless blackberry jam at the grocery store. Unless you really like to chew. If your jaw needs a workout, and you're tired of gum and Grape Nuts, by all means leave the seeds in.

It does look prettier with the seeds in, so there's that...

I let that cool and then made some blackberry cookie bars. After straining the seeds out of a large portion of the jam. Which took me half an hour. Because I am an idiot.

In case you're not paying attention, let me be clear: Strain first! Better yet, don't make blackberry jam without a food mill. Just buy a jar and save your jam efforts for wins like Tomato Jam.

After all that, I am not going to post the blackberry cookie bar recipe for you.


Mean, right? Not really. Actually, I am doing you a favor.

Here's why: They came out delicious but SUPER buttery. Too buttery, really. Eat-one-and-wonder-if-you're-going-to-be-ok-buttery. I would hate for you, dear reader, to make these and be all like: "Kate, if I wanted to lick a stick of butter, I would have just done that.  No need to gussy it up with your homemade jam."

Which is probably what my co-workers will say when I bring these cookies into work. 


Sorry in advance guys! Thanks for being my guinea pigs!
By the way, that milk isn't just food styling. You really will want some milk with these.
Consider yourselves warned.


Tuesday, July 09, 2013

July is National Hot Dog Month

I've been working from home today. East coast hours, if you must know.

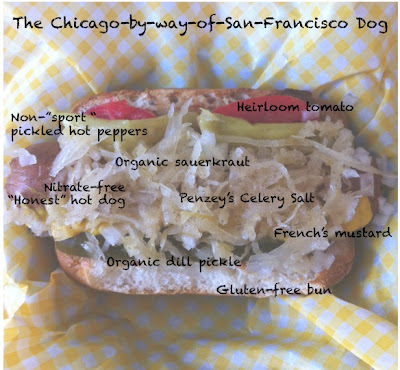
What that means is that I started working at 6:30am and after 7 straight hours of calls, I almost fell over from hunger. I believe that kind of marathon deserves a reward, so here's what I made and ate for lunch:


Turns out you can't get classic Chicago dog "sport peppers" in San Francisco. Well, not at my Whole Foods or at the Bristol Farms downtown.

I'm also bummed I didn't think to brush the bun with water and poppyseeds before toasting until after I was halfway through eating this thing. Maybe next time.

Still, on balance, this tasted pretty close to true. Better than I was expecting, actually!

Now if I only had some fries covered in melted Merkt's "cheddar" cheese spread...